The Trader’s Almanac: Unlocking the Market’s Hidden Rhythm with Seasonality

Have you ever had that feeling that the market just has a certain… mood? Some months feel like a relentless grind, while others seem to offer up opportunities on a silver platter. You’re not imagining it. This is market seasonality at play—a hidden rhythm that, once understood, can provide a powerful tailwind for your trading.

As traders, we build our strategies on structure, trend, and confluence. Seasonality is one of the most overlooked yet potent layers of that confluence. It’s the big-picture context; the prevailing current that can either help push your trades toward their targets or create a frustrating headwind you have to fight against.

Think of it like this: if your trading plan is your vehicle, seasonality is the weather report. You wouldn’t set off on a long road trip without checking the forecast, right? So let’s dive deep into the S&P 500’s historical patterns and learn how to use this “trader’s almanac” to our advantage.

More Than Just an Old Adage: Why This Matters

Before we break down the calendar, let’s be clear: seasonality is not a crystal ball. It’s a study of historical tendencies and probabilities, not a guarantee of future performance. You would never take a trade based only on the fact that it’s October.

However, when you combine these historical patterns with your core trading strategy—your technical analysis, your understanding of market structure, and your risk management rules—it becomes an incredibly valuable tool. It helps answer questions like:

  • Should I be more aggressive with my profit targets this month?

  • Should I consider reducing my trade size during this period?

  • Is the current market weakness typical for this time of year, or is it a sign of something more serious?

Understanding these patterns gives you a strategic edge and helps you stay psychologically prepared for what the market might throw at you.

The Big Picture: A Market of Two Halves

Before we even look at individual months or quarters, the most powerful seasonal trend is the division of the year into two distinct six-month periods.

  1. The “Best Six Months” (November – April): This is historically the most bullish period for the S&P 500. It kicks off with the strong year-end rally and carries that momentum through the first quarter. This is the market’s prime time, fueled by holiday optimism, fresh institutional allocations, and positive sentiment. During this phase, the market has a statistical tailwind.

  2. The “Worst Six Months” (May – October): This period is home to the famous adage, “Sell in May and Go Away.” While the market doesn’t necessarily fall for six straight months, historical returns during this half of the year are significantly weaker than in the first half. It’s a period often defined by summer slowdowns, lower liquidity, and the dreaded September slump. Here, we face a statistical headwind.

Just knowing which half of the year you’re in provides a massive top-down bias for your trading plan.

A Quarter-by-Quarter Deep Dive

Now, let’s zoom in and see how these broader patterns play out on a quarterly basis.

Q1 (January – March): The Optimism Quarter 🚀

The year typically starts strong. Q1 is often driven by a sense of renewal, with institutional investors putting new capital to work.

  • What to Expect: The quarter often starts with the January Effect, where optimism can fuel buying pressure. While February can sometimes be a bit choppy or see a minor pullback, March often finishes the quarter on a high note. Overall, Q1 is a period of net strength.
  • Sectors to Watch: Technology and Financials often perform well as investors place their bets for the year ahead.

Q2 (April – June): The Transition Quarter

Q2 is a tale of two halves. It starts with a bang but often ends with a whimper as the market transitions into its weaker seasonal period.

  • What to Expect: April is historically one of the strongest months of the year, often benefiting from positive sentiment carrying over from Q1. But then comes May, and the “Sell in May and Go Away” phenomenon begins to take hold. Market performance tends to become more subdued or choppy as we head into the summer.
  • Sectors to Watch: As the quarter progresses, you might see a rotation from growth-oriented sectors toward more defensive ones, like Utilities and Consumer Staples.

Q3 (July – September): The Summer Doldrums & September Slump 📉

Welcome to what is historically the weakest and trickiest quarter of the year. If there’s a time to be defensive and patient, this is it.

  • What to Expect: The quarter often begins with the “summer doldrums.” Trading volume thins out from late June through August, leading to choppy, sideways price action that can frustrate trend-followers. Then comes September, which holds the crown as the single worst-performing month for the S&P 500 historically. This is the peak of the statistical headwind.

Q4 (October – December): The Power Quarter 💪

After navigating the treacherous waters of Q3, traders are often rewarded with the strongest quarter of the year.

  • What to Expect: October has a reputation for being volatile and has hosted some infamous crashes, but it’s also known as a “bear killer” month where major bottoms are often formed. This sets the stage for November and December—two of the most consistently bullish months, supercharged by holiday cheer and institutional window dressing.

A Closer Look: The Personality of Each Month

While thinking in quarters is great for a high-level view, zooming in on the individual months reveals even more of the market’s unique character.

  • January: Generally positive, riding the wave of New Year optimism.

  • February: Often a cool-down month, where the market digests earlier gains. Can be choppy.

  • March: Tends to be a solid month, finishing the first quarter with strength.

  • April: A Standout Star ⭐. Historically one of the best months for the market. It’s the heart of the Q2 strength and a time to look for bullish opportunities.

  • May: The “Sell in May” period begins. Returns often become much more muted as the market enters its weaker half.

  • June: A mixed month that can see some chop as the summer doldrums begin to set in.

  • July: Often a bright spot in the summer, sometimes producing a decent rally before the late-summer weakness.

  • August: Performance is often sluggish with low volume as many traders are on vacation.

  • September: The Red Month 🚩. This is the one to circle on your calendar. Historically, September is the single worst-performing month for the S&P 500. It’s a time for maximum caution and defensive posturing.

  • October: The Volatile Turnaround Artist 🎢. Famous for its volatility and historical crashes, October is also known as a “bear killer.” It’s often the month where the market finds its footing after the Q3 weakness and begins its powerful year-end ascent.

  • November & December: The Power Duo 🏆. These two months are the engine of the Q4 rally. November is historically very strong, and December follows it up with the famous “Santa Claus Rally” into the year’s end. This is the market’s prime season for bullish momentum.

Putting It All Together: A Practical Framework

Now that we’ve seen the market’s rhythm from the annual, quarterly, and monthly perspectives, how do we actually use this in our day-to-day trading?

  1. Start with the Top-Down Context: First, identify where you are in the six-month cycle. Are you in the bullish (Nov-Apr) or bearish (May-Oct) half of the year? This sets your primary bias.

  2. Layer on Your Core Strategy: Seasonality is a background element, not the main event. Your primary focus should always be on market structure, trend, and price action on your key timeframes (Weekly, Daily, 4-Hour). A seasonal tailwind is useless if you’re buying directly into major resistance.

  3. Use It as a Confluence Factor: When a high-quality technical setup (like a bounce from a key support zone) aligns with a strong seasonal period (like November), that’s an A+ setup. Conversely, if you see a potential long setup in mid-September, the seasonal headwind should make you demand even more confirmation before taking the trade.

  4. Manage Risk Accordingly: Use seasonality to inform your risk parameters. In a strong seasonal period like Q4, you might feel more comfortable scaling into a winning trade. In a weak period like Q3, you might trade smaller sizes and be quicker to take profits.

By viewing the market through this seasonal lens, you add a layer of depth to your analysis, helping you to stay patient when you need to be and act decisively when the probabilities are stacked in your favor.

Stop Guessing: 4 Numbers That Can Define Your S&P 500 Trading Day

Hey everyone,

Let’s talk about the difference between gambling and trading. A gambler hopes. A trader prepares. A gambler plays on a feeling. A trader executes based on a statistical edge. For years, I’ve told traders in our room that the path to consistency is paved with discipline, a solid plan, and an understanding of what the market is most likely to do on any given day.

While no single day is ever a certainty, we can stack the odds so far in our favor that our decision-making becomes ten times clearer. How? By knowing the market’s habits.

I recently went over a deep-dive statistical report on the E-mini S&P 500 (ES), and a few numbers stood out with such force that they simply cannot be ignored. These aren’t just interesting data points; they are foundational probabilities that can shape your entire approach to the trading day. I’m talking about stats with probabilities over 80%, and today, I’m sharing four of the most powerful ones with you.

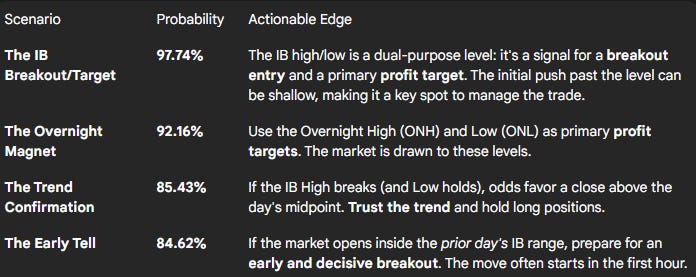
1. The Breakout is Almost a Guarantee (97.74%)

First, let’s talk about the Initial Balance (IB). For those who don’t know, this is the price range established in the first hour of the regular session (8:30-9:30 AM CT). This initial range is a benchmark for the day’s sentiment.

Here’s the killer stat: There is a 97.74% probability that the price will break either the high or the low of that initial one-hour range at some point during the trading day.

Think about that. The market is telling us, with near certainty, that the first hour’s range is not the final word. It’s the opening act.

How to use this: Our entire strategy is about finding our edge at the edges, and the IB high and low are the first critical ones drawn each day. These levels serve a powerful dual role. First, they are high-probability profit targets. If you’re in a move heading toward the IB, this is a prime spot to secure gains. Second, they are the launchpad for the day’s larger move. A sustained break and acceptance beyond the IB is the market signaling that the opening act is over and the real trend is beginning. This is the level to watch for a breakout, not a blind fade.

2. The Overnight Magnet (92.16%)

The overnight session isn’t just random noise. It establishes key levels that act as magnets for price during the regular trading day. The two most important are the Overnight High (ONH) and the Overnight Low (ONL).

The data shows that the market will touch either the ONH or the ONL during the regular session 92.16% of the time.

How to use this: The ONH and ONL are not just reference points; they are high-probability targets. When you’re in a trade, these levels become logical areas to take profits. Price is drawn to them. Whether it rejects hard or blows right through, the probability of at least a test is incredibly high. Mark them on your chart every single morning.

3. The Trend Day Confirmation (85.43%)

Okay, so we’ve had a breakout of the Initial Balance. What next? How do we know if the move has legs? This next statistic gives us a powerful clue.

If the IB High is broken but the IB Low remains intact, there is an 85.43% probability that the session will close above the day’s midpoint.

How to use this: This is your confirmation to trust the trend. If you see a clean, decisive break to the upside from the initial range, the odds are now heavily in your favor that the bullish sentiment will stick for the rest of the day. This should give you the confidence to hold your runners and not exit a winning trade too early, as the data suggests a strong close is likely.

4. The Early Tell (84.62%)

Some days, the market gives you a heads-up that a big move is coming early. This final statistic tells you when to be ready for it.

When the market opens inside the previous day’s Initial Balance range, it has an 84.62% probability of breaking out of that range within the first hour of the current session.

How to use this: If you walk in and see ES opened inside the prior day’s 8:30-9:30 AM range, don’t expect a slow morning. This is a setup for an early, decisive, and often aggressive move. The market is signaling that it’s ready to resolve the indecision from the previous day quickly. Be ready at the bell, because the move is likely coming sooner rather than later.

ES High-Probability Trading Cheat Sheet:

By understanding and applying these four data-backed tendencies, you can move from hoping to preparing. You can build a daily plan around what the market does most of the time, not what you wish it would do.

My Go-To High-Probability Setup: The 80% Rule

Hey everyone,

If there’s one question I get asked more than any other, it’s some version of this: “How do you know where the price is going to go?”

The honest answer? I don’t. And neither does anyone else.

As professional traders, we aren’t in the business of prediction; we’re in the business of probability. Our job is to identify market conditions where the odds are stacked in our favor, understand our risk, and execute with discipline. We are probability managers. When we find a setup with a high statistical likelihood of success, we have an edge.

Today, I want to pull back the curtain on one of the most reliable, high-probability setups I look for on a daily basis: The 80% Value Area Rule.

The Foundation: What is the "Value Area"?

Before we dive into the rule itself, we need to understand its foundation, which comes from a methodology called Market Profile.

At its core, Market Profile helps us understand the market as a two-way auction process. The most important concept it gives us is the Value Area (VA). In simple terms, the Value Area is the price range from the previous day where the majority of business was done—typically around 70% of the total volume.

Think of it as the market’s “comfort zone.” It’s the range of prices that buyers and sellers deemed fair and where they were most willing to transact. Prices outside this area are, by definition, considered less fair or “unfair” by the previous day’s participants. This distinction between “fair” and “unfair” prices is the key to everything.

The Setup: The 80% Rule Explained

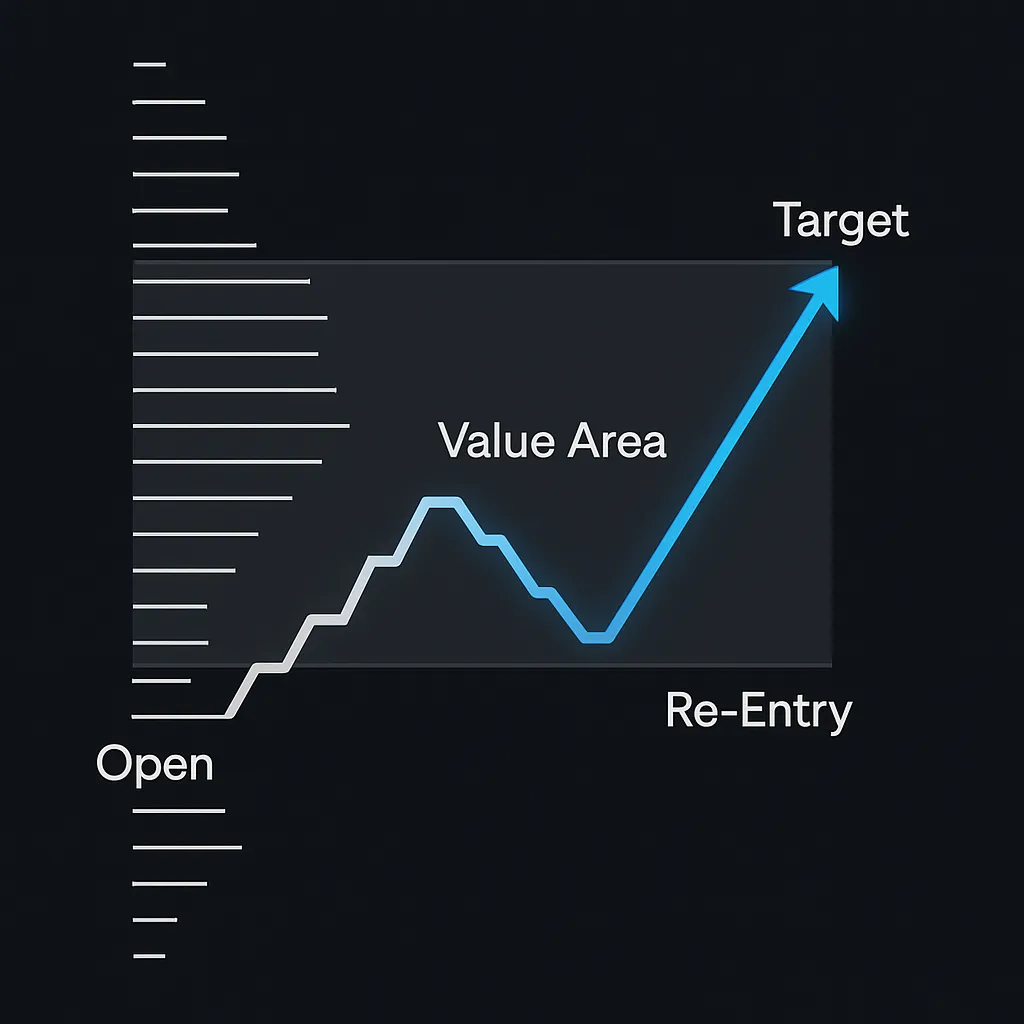
The rule itself, as described in the image you may have seen, is elegant in its simplicity. I have verified this pattern across years of data, and its logic is rooted in sound auction market theory.

Here are the conditions for the setup:

  1. Open Outside of Value: The market must open outside of the previous day’s Value Area. If it opens above the Value Area High (VAH), we watch for a bearish setup. If it opens below the Value Area Low (VAL), we watch for a bullish setup.

  2. Failed Auction & Re-Entry: After opening outside, the market fails to find new business and reverses to re-enter the prior day’s Value Area.

  3. Confirmation of Acceptance: This is the trigger. We need to see price “accepted” back inside the Value Area. The classic confirmation signal for this is seeing at least two consecutive 30-minute periods (or TPO prints) close back inside the VA. This signals that the move outside was rejected and the market now views the prior day’s value as the “fair” place to trade again.

Once these three conditions are met, the 80% Rule is active. It states there is now an ~80% probability that the market will trade all the way across the Value Area to the other side.

  • If the market opened below, re-entered the VA, and was accepted, the target is the Value Area High (VAH).

  • If the market opened above, re-entered the VA, and was accepted, the target is the Value Area Low (VAL).

How I Personally Trade This Setup

This isn’t just a textbook theory for me; it’s an actionable trade I actively hunt. When I see the potential for an 80% Rule trade, it gets my full attention.

My process is proactive, not reactive. I identify the prior day’s VAH and VAL during my pre-market prep.

  1. The Trigger: I am patiently watching for the open outside of value. Once price moves back inside, my alert is on. I use the 15-minute chart to monitor the potential trigger, but my confirmation is based on higher timeframes as per my trading rules—I want to see sustained acceptance back inside the VA, not just a quick pop. The two 30-minute closes is a classic signal, but building a position after the first 30-minute close is also part of my plan.

  2. The Entry: Once I have confirmation, I look to enter the trade. My entry will be a resting order placed just inside the value area (near the VAL for a long, or VAH for a short) at some sort of significant support or resistance. My goal is to get in on a small pullback after the acceptance is clear.

  3. The Stop-Loss: My stop is always placed just outside the Value Area. If the market reverses again and moves back out of the VA, the premise of the trade is invalidated. This gives me a clearly defined and manageable risk.

  4. The Target: My primary target is the other side of the Value Area. With an 80% probability on my side, this is a trade where I have the confidence to let it work, aiming for a large reward relative to my initial risk.

This setup is powerful because it provides everything a professional trader needs: a statistical edge, a clear entry trigger, a defined risk (stop-loss), and a logical target. It’s the definition of a high-probability trade.